
Thursday, July 21, 2016

Thursday, January 21, 2016
Create Charts using SharePoint List data, JavaScript and Google charts
- Create a custom list name as Bar Chart List
- Create a list columns (Month, Actual, Cummulative, Cummulative Goal)
- Using SharePoint REST call we will fetch data from list and bind to temp array variable
- pass that variable to google chart function
- chat will be created
- We have two files HTML and JS
HTML File
script type="text/javascript" src="https://www.gstatic.com/charts/loader.js"></script>
<script type="text/javascript" src="/SiteAssets/LMS/JS/EmcoreBarchart.js"></script> <!-- Update JS path -->
<div id="chart_div" style="width: 700px; height: 500px;"></div>
<script type="text/javascript">
// Load the Visualization API and the piechart package.
google.charts.load('current', { 'packages': ['corechart'] });
</script>
JS File
var asiaData = [];
var Header = ['Month', 'Actual', 'Cummulative', 'Cummulative Goal'];
(function ($) {
$(document).ready(function () {
// Ensure that the SP.js file is loaded before the custom code runs.
SP.SOD.executeOrDelayUntilScriptLoaded(CreateBarChart, 'SP.js');
});
function CreateBarChart() {
var listName = "Bar Chat List";
jQuery.ajax({
url: _spPageContextInfo.siteAbsoluteUrl + "/_api/web/lists/getbytitle('" + listName + "')/Items?$orderby=Modified desc&",
type: "GET",
headers: { Accept: "application/json;odata=verbose" },
success: function (data) {
$("#mainPlantandOfficeTable").html();
if (data.d.results.length > 0) {
var results = data.d.results;
asiaData.push(Header);
$.each(results, function (index, dataPlants) {
var temp = [];
var PlantID = dataPlants.Id;
var barMonth = dataPlants.Month;
var barActual = dataPlants.Actual;
var barCummulative = dataPlants.Cummulative;
var barCummulativeGoal = dataPlants.CummulativeGoal;
temp.push(barMonth);
temp.push(parseFloat(barActual));
temp.push(parseFloat(barCummulative));
temp.push(parseFloat(barCummulativeGoal));
asiaData.push(temp);
});
//function for bar chart
google.charts.setOnLoadCallback(drawVisualization);
}
},
error: function (jqXHR, textStatus, errorThrown) {
Console.log("EmcoreBarchat.js:CreateBarChart:: " + textStatus);
}
});
}
})(jQuery);
function drawVisualization() {
var data = google.visualization.arrayToDataTable(asiaData);
var options = {
title: 'Lean Training',
//vAxis: { title: 'Cups' },
//hAxis: { title: 'Month' },
seriesType: 'bars',
pointSize: 10,
series: { 1: { type: 'line', pointShape: 'circle' }, 2: { type: 'line' } }
};
var chart = new google.visualization.ComboChart(document.getElementById('chart_div'));
chart.draw(data, options);
}
Ref Link: https://google-developers.appspot.com/chart/interactive/docs/gallery/combochart#example
Ref Link: https://google-developers.appspot.com/chart/interactive/docs/gallery/combochart#example
Wednesday, January 20, 2016
SharePoint List data bind to Drop down control using JavaScript
I create a list in Sharepoint which has 3 columns Title,Label and SiteUrl as per business requirement label want to show text and Url will be the value using javascript.
Need add this HTML into file
<div id="divVariationLabel">
<select id="drpVariationlbl" id="drpVariationlbl" onchange="redirectSite()" />
</div>
Create JS file add this below script into it then add this file reference into the HTML file.
/***************************************************************************
* Name : CreateDrodown.js *
* Descritption : This is the javascript file for creatig dropdown using List data *
***************************************************************************/
var countryData = [];
(function ($) {
$(document).ready(function () {
// Ensure that the SP.js file is loaded before the custom code runs.
SP.SOD.executeOrDelayUntilScriptLoaded(CreateDropdown, 'SP.js');
});
/***************************************************************
* Function : CreateDropdown *
* Descritption : This function is used to fill the Dropdown *
***************************************************************
function CreateDropdown() {
var listName = "Variation Label";
jQuery.ajax({
url: _spPageContextInfo.siteAbsoluteUrl + "/_api/web/lists/getbytitle('" + listName + "')/Items",
type: "GET",
headers: { Accept: "application/json;odata=verbose" },
success: function (data) {
if (data.d.results.length > 0) {
var results = data.d.results;
$.each(results, function (index, dataLabels) {
var temp = [];
var PlantID = dataLabels.Id;
var countryName = dataLabels.Title;
var countryLabel = dataLabels.Label;
var countrySiteUrl = dataLabels.SiteUrl;
//temp.push('<div class="maptitle">' + dataPlants.Title + '</div>' + plantOfficeAddress);
temp.push(countryName);
temp.push(countryLabel);
temp.push(countrySiteUrl);
countryData.push(temp);
});
for (var subArr in countryData) {
$('<option />', { value: countryData[subArr][2].Url, text: countryData[subArr][0], variationlabel: countryData[subArr][1] }).appendTo('#drpVariationlbl');
}
}
}
});
}
})(jQuery);
Need add this HTML into file
<div id="divVariationLabel">
<select id="drpVariationlbl" id="drpVariationlbl" onchange="redirectSite()" />
</div>
Create JS file add this below script into it then add this file reference into the HTML file.
/***************************************************************************
* Name : CreateDrodown.js *
* Descritption : This is the javascript file for creatig dropdown using List data *
***************************************************************************/
var countryData = [];
(function ($) {
$(document).ready(function () {
// Ensure that the SP.js file is loaded before the custom code runs.
SP.SOD.executeOrDelayUntilScriptLoaded(CreateDropdown, 'SP.js');
});
/***************************************************************
* Function : CreateDropdown *
* Descritption : This function is used to fill the Dropdown *
***************************************************************
function CreateDropdown() {
var listName = "Variation Label";
jQuery.ajax({
url: _spPageContextInfo.siteAbsoluteUrl + "/_api/web/lists/getbytitle('" + listName + "')/Items",
type: "GET",
headers: { Accept: "application/json;odata=verbose" },
success: function (data) {
if (data.d.results.length > 0) {
var results = data.d.results;
$.each(results, function (index, dataLabels) {
var temp = [];
var PlantID = dataLabels.Id;
var countryName = dataLabels.Title;
var countryLabel = dataLabels.Label;
var countrySiteUrl = dataLabels.SiteUrl;
//temp.push('<div class="maptitle">' + dataPlants.Title + '</div>' + plantOfficeAddress);
temp.push(countryName);
temp.push(countryLabel);
temp.push(countrySiteUrl);
countryData.push(temp);
});
for (var subArr in countryData) {
$('<option />', { value: countryData[subArr][2].Url, text: countryData[subArr][0], variationlabel: countryData[subArr][1] }).appendTo('#drpVariationlbl');
}
}
}
});
}
})(jQuery);
Sunday, December 27, 2015
Get logged in user info using SharePoint REST call
Get Current user info from SharePoint Userprofile using Ajax REST call
(function ($) {
$(document).ready(function () {
// Ensure that the SP.js file is loaded before the custom code runs.
SP.SOD.executeOrDelayUntilScriptLoaded(loadUserData, 'SP.js');
});
function loadUserData() {
jQuery.ajax({
url: _spPageContextInfo.webAbsoluteUrl + "/_api/SP.UserProfiles.PeopleManager/GetMyProperties",
type: "GET",
headers: { Accept: "application/json;odata=verbose" },
success: function (data) {
if (data.d.DisplayName != null)
var curDisplayName = data.d.DisplayName;
var curEmail = data.d.Email;
empEmail = curEmail;
if (data.d.UserProfileProperties != null) {
$.each(data.d.UserProfileProperties.results, function (index, value) {
if (value.Key == "Office") {
empLocation = data.d.UserProfileProperties.results[index].Value;
}
});
}
},
error: function (jqxr, errorCode, errorThrown) {
alert("Error: " + args.get_message());
}
});
}
})(jQuery);
Count number of weekends between two dates using JavaScript
Simple function to calculate number of weekends in-between from and to dates
/********************************************************************************
* Function : getWeekend *
* Descritption :This function is used to return the number of weekends in-between form and to Dates* ********************************************************************************/
function getWeekend(dString1, dString2) {
var aDay = 24 * 60 * 60 * 1000;
var d1 = new Date(Date.parse(dString1)); //"MM/DD/YYYY"
var d2 = new Date(Date.parse(dString2));
var weekend = {
Sat: 0,
Sun: 0
}
for (var d, i = d1.getTime(), n = d2.getTime() ; i <= n; i += aDay) {
d = new Date(i).getDay();
if (d === 6) weekend.Sat++;
if (d === 0) weekend.Sun++;
}
return weekend.Sat + weekend.Sun;
}
/********************************************************************************
* Function : getWeekend *
* Descritption :This function is used to return the number of weekends in-between form and to Dates* ********************************************************************************/
function getWeekend(dString1, dString2) {
var aDay = 24 * 60 * 60 * 1000;
var d1 = new Date(Date.parse(dString1)); //"MM/DD/YYYY"
var d2 = new Date(Date.parse(dString2));
var weekend = {
Sat: 0,
Sun: 0
}
for (var d, i = d1.getTime(), n = d2.getTime() ; i <= n; i += aDay) {
d = new Date(i).getDay();
if (d === 6) weekend.Sat++;
if (d === 0) weekend.Sun++;
}
return weekend.Sat + weekend.Sun;
}
Wednesday, December 16, 2015
SharePoint Calendar color coding based on categories using Javascript
In the calendar view we have different kind of categories so based on selected category we have applied different color coding in calendar view using JavaScript.
Add this below script into the page using Content Editor Webpart
$(window).bind("load", function() {
// code here
ColorCalendar();
//This will help to previous or next month calendar
$('a[title="Previous Month"]').bind('click', function (event) {
setTimeout(function () {
//do what you need here
ColorCalendar();
}, 1000);
});
$('a[title="Next Month"]').bind('click', function (event) {
setTimeout(function () {
//do what you need here
ColorCalendar();
}, 1000);
});
});
function ColorCalendar() {
var arrayofDivItems = $('div[class="ms-acal-item"] a');
$('div[class="ms-acal-item"] a').each(function(i) {
var colour = GetColourCodeFromCategory(this.text);
if(this.parentNode.parentNode.parentNode.className == 'ms-acal-item')
{
this.parentNode.parentNode.parentNode.style.backgroundColor = colour;
}
else if(this.parentNode.parentNode.className == 'ms-acal-item')
{
this.parentNode.parentNode.style.backgroundColor = colour;
}
else if(this.parentNode.className == 'ms-acal-item')
{
this.parentNode.style.backgroundColor = colour;
}
});
}
function GetColourCodeFromCategory(category) {
var colour = null;
switch (category.trim().toLowerCase()) {
case 'leave':
//green
colour = '#FF0000';
break;
case 'wfh':
//yellow
colour = '#FF9900';
break;
case 'compoff':
//blue
colour = '#0FAD00';
break;
case 'paternity leave':
//blue
colour = '#0010A5';
break;
case 'meternity leave':
//blue
colour = '#0010A5';
break;
}
return colour;
}
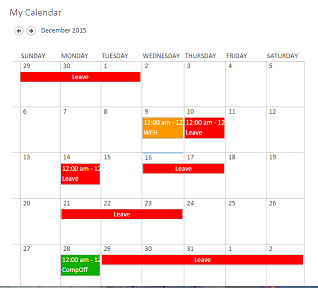
Add this below script into the page using Content Editor Webpart
$(window).bind("load", function() {
// code here
ColorCalendar();
//This will help to previous or next month calendar
$('a[title="Previous Month"]').bind('click', function (event) {
setTimeout(function () {
//do what you need here
ColorCalendar();
}, 1000);
});
$('a[title="Next Month"]').bind('click', function (event) {
setTimeout(function () {
//do what you need here
ColorCalendar();
}, 1000);
});
});
function ColorCalendar() {
var arrayofDivItems = $('div[class="ms-acal-item"] a');
$('div[class="ms-acal-item"] a').each(function(i) {
var colour = GetColourCodeFromCategory(this.text);
if(this.parentNode.parentNode.parentNode.className == 'ms-acal-item')
{
this.parentNode.parentNode.parentNode.style.backgroundColor = colour;
}
else if(this.parentNode.parentNode.className == 'ms-acal-item')
{
this.parentNode.parentNode.style.backgroundColor = colour;
}
else if(this.parentNode.className == 'ms-acal-item')
{
this.parentNode.style.backgroundColor = colour;
}
});
}
function GetColourCodeFromCategory(category) {
var colour = null;
switch (category.trim().toLowerCase()) {
case 'leave':
//green
colour = '#FF0000';
break;
case 'wfh':
//yellow
colour = '#FF9900';
break;
case 'compoff':
//blue
colour = '#0FAD00';
break;
case 'paternity leave':
//blue
colour = '#0010A5';
break;
case 'meternity leave':
//blue
colour = '#0010A5';
break;
}
return colour;
}
Wednesday, December 2, 2015
Send an email to distribution group using SPD Workflow
Has anyone
sent a mail to a group (Distribution group in network terminology) from outlook?
Most of you guys have done. But this is not something which is feasible using SharePoint
designer workflow.
Background
This blog
will give you an insight of sending an email to distribution group using alias
email in organization.
What is distribution
group?
We can create
a distribution groups in Active Directory for organization using this group we will
have collection of two or more people in members section that appears in your
organization’s address book. Distribution
groups are not security-enabled and this group will not be resolved in
SharePoint address book, which means that they cannot be listed in
discretionary access control lists (DACLs). When we want send an email
to group of people then we will use distribution group, it goes to all members
of the group.
Why Security
Group?
Security groups are used to
control access to resources. Using security groups, you can assign permissions
to security groups in AD or on resources. Meanwhile, security groups can be
mail enabled and security group will be resolved in SharePoint address book.
When we
create a SharePoint Designer workflow with an action of sending a mail to alias
email we had an issue while adding into the email section using address book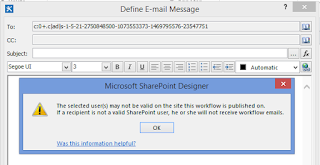

Steps to
follow to avoid this issue
1.
Create the Security Group through the Microsoft
Online Services Portal (MOS Portal)

2.
Add the Distribution list as member of Security
group
3.
Change the settings in Delivery management
section as below

4.
Then setup the email action use the address
book to locate the security group
5.
We can add this security group under the
SharePoint Group as a use
Hope this
helps.
Subscribe to:
Posts (Atom)